


How to Make Maki Sushi: A Step-by-Step Guide to Crafting Perfect Sushi Rolls at Home
Making maki sushi at home is a fun and rewarding experience! With a little practice, you can create beautiful sushi rolls that rival those from your favorite restaurant. Here’s a step-by-step guide to making classic maki sushi:
Ingredients You’ll Need
- Sushi rice: 2 cups (short-grain Japanese rice)
- Rice vinegar: 3 tablespoons
- Sugar: 1 tablespoon
- Salt: 1 teaspoon
- Nori (seaweed sheets): 4-6 sheets
- Fillings: Choose your favorites! Some popular options include:
- Fresh fish (e.g., tuna, salmon) or cooked seafood (e.g., crab, shrimp)
- Vegetables (e.g., cucumber, avocado, carrots)
- Tamago (sweet Japanese omelet)
- Optional: Soy sauce, wasabi, and pickled ginger for serving
Tools You’ll Need
- Bamboo sushi mat (makisu)
- Sharp knife
- Small bowl of water (for dipping your fingers)
- Plastic wrap (optional, to keep the mat clean)
Step-by-Step Instructions
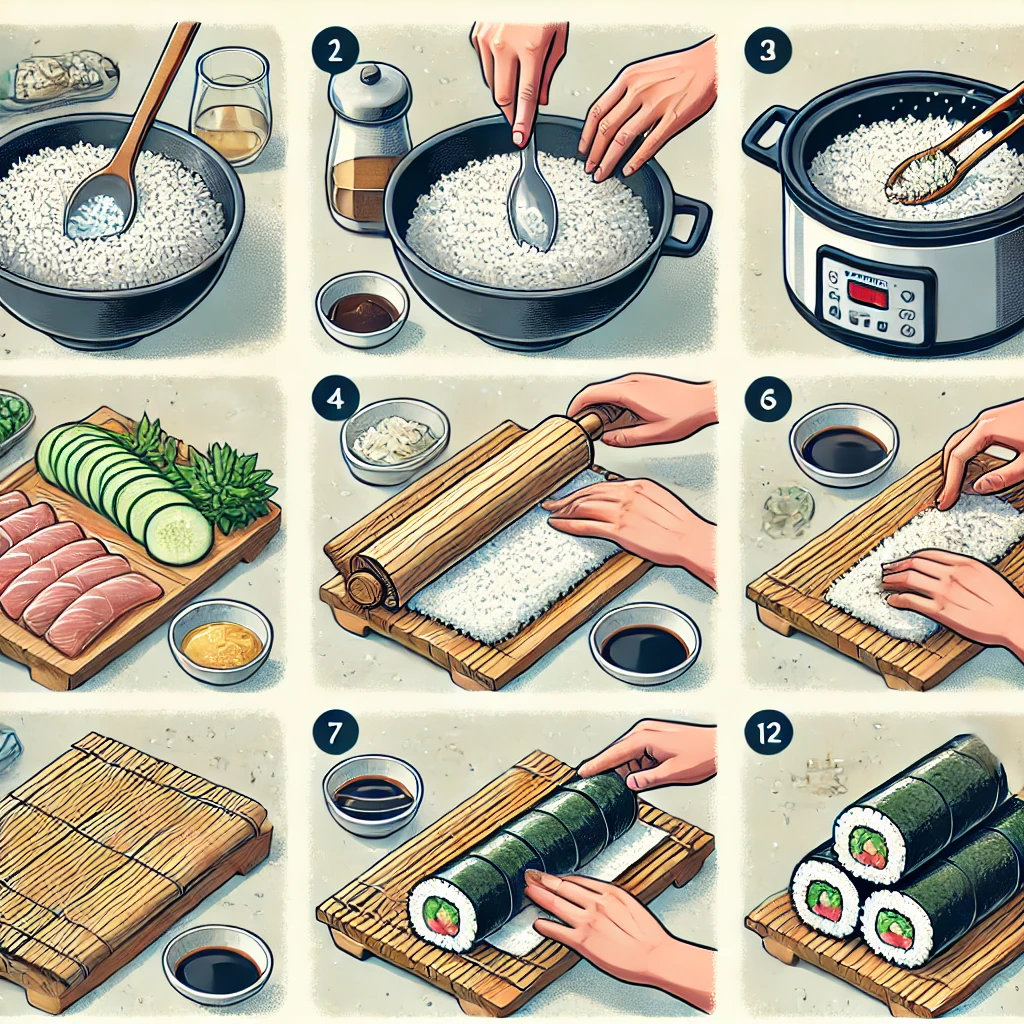
1. Prepare the Sushi Rice
- Rinse 2 cups of sushi rice under cold water until the water runs clear.
- Cook the rice according to the package instructions or using a rice cooker.
- In a small saucepan, combine 3 tablespoons of rice vinegar, 1 tablespoon of sugar, and 1 teaspoon of salt. Heat gently until the sugar and salt dissolve.
- Once the rice is cooked, transfer it to a large bowl. Gradually add the vinegar mixture while gently folding the rice with a wooden spatula. Be careful not to smash the grains.
- Let the rice cool to room temperature before using.
2. Prepare Your Fillings
- Slice your chosen fillings into thin, even strips. For example:
- Cut fish into long, thin slices.
- Slice cucumbers and avocados into matchstick-sized pieces.
- Have all your fillings ready and within reach before you start rolling.
3. Set Up Your Rolling Station
- Place your bamboo sushi mat on a clean surface. If desired, wrap it in plastic wrap to keep it clean.
- Lay a sheet of nori on the mat, shiny side down.
- Dip your fingers in water to prevent the rice from sticking, then grab a handful of sushi rice (about ¾ cup).
4. Spread the Rice on the Nori
- Gently spread the rice evenly over the nori, leaving a 1-inch border at the top edge (this will help seal the roll).
- Press the rice lightly to ensure it sticks to the nori but isn’t packed too tightly.
5. Add the Fillings
- Place your fillings horizontally across the center of the rice. Don’t overfill—this will make rolling difficult.
- For example, you might lay down a strip of fish, a few avocado slices, and a cucumber stick.
6. Roll the Maki
- Lift the edge of the bamboo mat closest to you and fold it over the fillings, tucking them in tightly.
- Continue rolling forward, applying gentle pressure to create a compact cylinder.
- When you reach the bare edge of the nori, moisten it with a little water to seal the roll.
7. Slice the Roll
- Use a sharp knife to cut the roll into 6-8 even pieces. Dip the knife in water between cuts to prevent sticking.
- Wipe the knife clean after each cut for neat slices.
8. Serve and Enjoy!
- Arrange the maki sushi pieces on a plate.
- Serve with soy sauce, wasabi, and pickled ginger on the side.
- Enjoy your homemade maki sushi!
Tips for Success
Use fresh ingredients: The quality of your sushi depends on the freshness of your fish and vegetables.
Don’t overfill: Too much filling can make the roll difficult to seal and slice.
Practice makes perfect: Rolling sushi takes practice, so don’t be discouraged if your first few attempts aren’t perfect.
Making maki sushi at home is a great way to explore your creativity and enjoy a delicious, healthy meal. Once you master the basics, you can experiment with different fillings and styles. Happy rolling! 🍣

- Real Estate
- Family
- Politics
- Study
- Education
- Business
- SEO
- Marketing
- Science
- Crypto
- Learning
- How To
- Astrology
- Places
- Travel
- Risks Management
- Event
- Insurance
- Breaking News
- News Update
- Information Technology
- Reference
- Art
- Causes
- Crafts
- Dance
- Drinks
- Film
- Fitness
- Food
- Games
- Recipes
- Gardening
- Health
- Home
- Literature
- Music
- Networking
- Other
- Party
- Religion
- Shopping
- Sports
- Theater
- Health & Wellness
